

The Complete Guide to Growing Psilocybin Mushrooms at Home with the PF Tek
Table of contents
- Introduction and background
- Items you will need
- Tek Overview
- Step 1: Preparation
- Step 2: Inoculation
- Step 3: Colonization
- Step 4: Grow Chamber Prep
- Step 5: Fruiting
- Step 6: Harvesting
- Step 7: Drying and Storage
- Step 8: Multiple Flushes
Introduction
Worldwide interest in psychedelic magic mushroom cultivation has exploded in recent history. This maybe be due to increased media coverage of the potential benefits of psilocybin mushrooms and the subsequent decriminalization of the substance in various states. Consequently, home growers and hobbyists are more common than ever before. Commercial mushroom cultivation often requires large equipment and plenty of space. So can you grow mushrooms at home?
Yes you can!
Growing psilocybin mushrooms in your home is not only a rewarding and fun hobby, but it’s also relatively inexpensive and can provide a year-round supply of your favorite mushrooms.
While some online guides will promote the use of pre-made psilocybin mushroom grow kits, we’ve found that these kits take all of the fun and learning out of cultivation; not to mention the rewarding experience of growing mushrooms from scratch.
This guide therefore includes everything you need to start a psychedelic mushroom grow from scratch, which will provide you with the control to achieve more consistent and reliable results than may result from a kit.
BACKGROUND ON THIS GUIDE
This cultivation method is based on the most common and widely respected Robert McPherson’s eponymous PF “Psylocybe Fanaticus” Tek.
Robert’s research and contribution to the community of indoor mushroom growers was revolutionary at the time and has become the go-to method for beginner and professional growers alike.
The PF Tek’s key innovation was to add vermiculite to a spawning substrate that is grain based (instead of using only grain). This allows additional cavities for the mycelium to grow and provides exceptional moisture retention which closer mimics the mushrooms natural growing conditions.
The PF Tek method is simple, reliable, and cheaper than traditional methods, thus making it ideal for beginners.
Photo credit: u/psycophreak via reddit
SPORE SYRINGES
A spore syringe is nothing more than a scientific syringe that contains a mixture of sterilized water and mushroom spores (think of these as mushroom seeds). The syringe is used to inoculate – or “sow” the foundation on which your mushrooms will be produced (mycelium).
While we recommend making your own spore syringes, beginners will need to purchase a pre-filled syringe from a spore syringe supplier.
Before doing so, however, make sure to do your research to find a trustworthy reputable supplier; misidentified stains, contamination and even syringes with little or no spores are common issues when buying from unknown sources.
After your first mushrooms grow (flush) you can begin filling your own syringes. We cover this process in our how to make a spore syringe post.
WHAT MAGIC MUSHROOM STRAIN SHOULD YOU GROW?
There are over 250 fungal species that produce mushrooms with psychoactive compounds. Unfortunately, the majority of these species require precise environmental growing conditions and are considered difficult to grow. With that being said, as a beginner, your best chance for success will be to use a beginner-friendly strain such as the Psilocybe cubensis.
The P. cubensis is a domesticated strain and is well known for its potency and ease of growth. The P. cubensis family includes many sub-species, some of which are more forgiving than others. It’s recommended that you start with a beginner-friendly variant such as Golden Teacher or B+.
These variants are more forgiving to less than ideal environmental conditions and are a great starting point to learn about growing psilocybin mushrooms.
After your first successful grow, it’s likely you will be eager to learn about cultivating more difficult and potent varieties like the ever-so-popular Penis Envy strain.
THINGS YOU WILL NEED:
SUPPLIES
- Spore syringe, 10-12 cc
- Distilled water
- Vermiculite, medium to coarse grade
- Organic brown rice flour
EQUIPMENT
- Hammer and small nail – (not necessary if you have pre-made lids)
- Mixing bowl
- 12 wide-mouth half-pint jars with lids (e.g. Ball or Kerr jelly or canning jars)
- Strainer
- Perlite
- Heavy-duty tin foil
- Power drill with a ¼-inch drill bit
- Small towel (or approx. 10 paper towels)
- Micro-pore tape
- Clear plastic storage box, 50qt or smaller
- Pressure cooker/canner
- Mist spray bottle
- Measuring cup
HYGIENE SUPPLIES
- Butane/propane torch lighter
- Surgical mask (optional)
- Surface disinfectant
- Sterilized latex gloves (optional)
- Air sanitizer
- Still air or glove box (optional)
- Rubbing alcohol
INSTRUCTIONS
There are many different ways to grow mushrooms. In this article we are focusing on one of the easiest methods, the “PF Tek”.
The PF Tek is a pretty straightforward process. Essentially you will be creating the mushroom growing substrate by mixing brown rice flour, vermiculite and water.
Using this mixture you will then fill half-pint jars, cap & seal, and inject your spores through a small hole in the lid using a spore syringe.
Next you wait wait 1-3 weeks for the mycelium to develop and fully colonize the substrate. Mycelium is the network of white filament which the mushroom grows from.
Once the substrate has been completely colonized you will remove the mycelium “cakes” from their jars and transfer to a “fruiting chamber”, which is the stage in which mushrooms will grow from the mycelium.
IMPORTANT NOTE: Mushrooms are highly susceptible to contamination from bacteria, mold, and other airborne contaminants. Therefore, it is of utmost importance that you choose a clean area to perform your mycology work. Make sure to disinfect your surfaces and equipment as well as spray an air sanitizer before working with your mushrooms. You’ll want to treat your work-space as a clean room; maintaining a sterile environment as much as possible.
STEP 1: PREPARATION
1) Prepare jars:
- Wipe down the insides of your jars with rubbing alcohol to disinfect using towel or cloth
- Punch four holes in each of the lids, evenly spaced around their circumferences using nail and hammer (which should be wiped with alcohol to disinfect)
- If you want to save some time and have a more professional looking setup you can purchase pre-prepared lids here. If using pre-prepared lids, you will simply need to wipe down the lids with alcohol to disinfect.
2) Prepare substrate:
- The ratio you will be using is roughly 2/1/1 – Vermiculite, water, and brown rice flower respectively.
- For each jar you will be making you will combine ½ cup vermiculite and ¼ cup of water to a mixing bowl. Mix thoroughly.
- Once mixed, add in a ¼ cup brown rice flour per half-pint jar, stirring the mixture to while adding. Its easiest to use your hands to ensure all three ingredients are mixed evenly.
3) Fill “spawn” jars:
- Fill your mason jars with the mixture to about a half-inch from the rim. Make sure not pack too tightly, tap the bottom of the jar lightly on a hard surface to pack down.
- Rub the exposed top half inch of the inside of the jar with rubbing alcohol to sterilize.
- To prevent contamination you will then insulate the substrate by adding a thin layer of dry vermiculite to the top of the moist substrate mixture,1/2 inch should do.
4) Sterilization:
- Place the lids on your jars and tighten until snug, (not too tight)
- Use tin foil to cover the jar lids, securing the foil around the sides of the jars. This is done to prevent condensation and water from getting through the holes in the lid.
- Fill your pressure cooker with water. You will want to make sure there is enough water so that it does not run out while sterilizing. I’ve found that a gallon of water does the trick for a large pressure cooker; roughly three inches of water in the pressure cooker.
- Add a small rack to the inside of the pressure cooker to raise the jars so that they are not fully submerged in the water. extra jar lids can be effective in raising the height .
- Place all jars in the pressure cooker.
- Secure the pressure cooker lid and introduce to high heat, bringing the pressure up to 15psi.
- Reduce heat to maintain this pressure. Now we set a timer for 90 minutes.
- Once the time is up you will remove the cooker from heat and allow to cool for 12-24 hours. The jars will need to be at room temperature before we proceed with inoculation.
STEP 2: INOCULATION
1) Clean your work area and prepare spore syringe:
- Wipe down your work area completely with rubbing alcohol and spray an air sanitizer if available. Its best to find a place to work with limited air-flow as to cut down on the potential for airborne contaminants.
- Arrange all utensils so that your spawn jars, spore syringe, rubbing alcohol, gloves, paper towels, micro-pore tape and flame are all within reach.
- Next, you will glove up, and carefully remove the tinfoil from the top of the jars making sure to keep the jars level. Wipe all of the jar lids with a paper towel soaked in rubbing alcohol.
2) Inject spores:
- Shake up your spore syringe so that the mushroom spores are evenly distributed.
- Remove the cap from your syringe and hold the tip of the needle over a flame. You will heat it until the metal glows red hot. Give it a second to cool and then wipe with your alcohol paper towel.
- Inject approximately ¼ cc of the spore solution per hole, with the needle touching the side of the jar. You will be injecting 1cc of the spore solution per half-pint jar.
- Wipe down your needle with alcohol wipe/paper towel after each injection.
- Set the inoculated jar aside and cover the holes using your micro-pore tape.
- Repeat this inoculation process for each of the remaining jars.
- Set your inoculated jars in a clean, dry and dark place out of the way.
STEP 3: COLONIZATION
Set your inoculated jars in a clean, dark place out of the way. While colonizing, the jars will need to be maintained at a temperature of 75-80 degrees Fahrenheit. Within seven to 14 days you will begin to notice white fluffy mycelium spreading outwards from the injection sites within the substrate.
After three to four weeks the substrate should be completely colonized with beautiful white mycelium. This process can take up to six weeks depending on the strain.
IMPORTANT NOTE: Check daily for any indication of contamination, such as strange colors or smells. Get rid of any suspected contaminated jars immediately. Do this in a sealed bag outdoors away from your colonization area. If you are not sure that a jar is contaminated, its best to be safe than sorry; toss the jars as some contaminants can kill human beings.
STEP 4: PREPARING THE GROW CHAMBER
For this guide, we will be building what is referred to as a shotgun fruiting chamber. This is just one of many fruiting methods but is great for beginners due to its simplicity and effectiveness. After your first successful grow you may choose to experiment with other, more advanced fruiting methods.
For this we will need:
- Clear plastic storage container – 50 qt or at least 12″ in height
- Drill and ¼-inch drill bit
- Sharpie or marker
- Ruler
- Perlite
- Strainer
- Water
- Rubbing Alcohol
- Scrap wood (optional)
Ventilation:
Before drilling our ventilation holes in the storage container we will want to use a ruler or tape measure to mark the hole placements in two-inch increments on all sides of the container (lid and bottom included). Once marked, drill your holes from the inside out using a block of scrap wood on the opposite side of the bit so as to avoid cracking (optional but recommended)
Once drilled, wipe down the inside of the tub with a rag soaked in alcohol.
Set the container on a rack or four stable objects to raise the bottom allowing for air-flow underneath the container. May want to set down a towel or something to catch any moisture that may leak out from the bottom.
Moisture (Perlite):
- Fill your kitchen strainer with Perlite and run under cold water allowing it to soak up moisture and remove impurities.
- Once washed, wait for the excess moisture to stop dripping from the strainer.
- Dump the moist Perlite into our chamber and spread evenly using your hands.
- Repeat this process until you have a layer of Perlite approximately 4-5 inches deep.
Check out the video tutorial below demonstrating this process.
STEP 5: FRUITING
Now that we have our chamber completed, we can prepare the colonized cakes.
To fruit we will first ”Birth” the colonized substrates cakes (remove them from their jars), then we will rehydrate the cakes by dunking them, and finally, we will be applying a casing layer of vermiculite to help retain moisture. Steps are as follows:
Birth:
- Wash your hands thoroughly and put on a pair of latex gloves.
- Remove the lids from your jars.
- Turn the jar upside down, and pour out any loose dry vermiculite.
- Gently tap the open end of the jar on to your palm to loosen the cake from the jar. Continue to tap until the cake drops on to your hand. Set aside on a clean surface and repeat for each jar.
Dunk:
For this you may use any container such as a large cooking pot or Ziploc bag. The idea is to fully submerge the cakes in water for 12-24 hours. If using a pot, you will need to place something on top of the floating cakes so that they are submerged.
- Fill a large Ziploc bag or another container with room temperature water.
- Carefully place each cake inside.
- Dunk – place something over them if using a pot, otherwise remove air from the Ziploc bag and seal. Set aside for 12-24 hours.
Casing Layer:
- Remove the cakes from the water and place them on a disinfected surface.
- Fill your mixing bowl with dry vermiculite.
- Roll your cakes one by one to fully coat them in vermiculite. This will help to keep-in the moisture.
Transfer to Grow Chamber:
- Cut a tin foil square for each of your cakes, large enough for them to sit on without touching the Perlite. Alternately you may use clean jar lids if available.
- Space these evenly inside the grow chamber.
- Place your cakes on top of the foil squares and gently mist the chamber with a spray bottle containing water.
- Fan the chamber using the lid before closing.
Conditions and Maintenance:
- Set your fruiting chamber in a clean well lit area, keeping it out of direct sunlight. Ideal conditions are between 70-80 degrees Fahrenheit.
Mist the walls of your fruiting chamber with water three to six times daily to keep the humidity levels up.
Fan the tub daily using the lid, typically after misting.
STEP 6: HARVESTING MUSHROOMS
Your mushrooms, or fruits, will appear as tiny white bumps before sprouting into “pins.” Pins can be thought of as the baby mushrooms.
5-12 days after pinning your mushrooms should be ready to harvest.
How long to grow magic mushrooms?
You’ll know that the mushrooms are ready when the veil underneath the cap begins to separate from the cap.
Once the veil breaks the mushroom will begin to drop tiny black spores and will start to lose potency, so its best to harvest immediately before or after the veil breaks.
To harvest, you will first remove the cake from the chamber.
Grab mature fruits by the stem as close to the cake as you can, then twist off gently.
Clean any remaining vermiculite from the base of the mushroom using a clean knife or other utensil.
Set aside for drying.
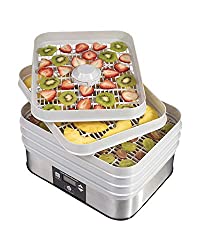
Step 7: Drying and Storage
Magic mushrooms can be stored fresh in the fridge for a short amount of time but will go bad after a week or so. That said, many growers will dehydrate their harvest which will allow them to last far longer and may be used in a variety of ways. Your goal here is to eliminate all moisture from the mushrooms leaving them “cracker dry”.
The simplest and most effective method to accomplish this is to use a food dehydrator. I found my first one after searching many thrift stores for as low as $5, however, you may also buy new. The problem we’ve found with standard dehydrators is that the trays often do not provide enough space between each other, which can be a problem for your BIG fruits. We’ve included links to a couple of dehidrators we have used and reccomend.
Best Value Used
Find a used food dehydrator at your local thrift store!
Best Value New

![]()
Best for Bigger Fruits.
![]()
Another method of drying your fruits is to simply set them outside in a sunny area with fresh airflow. You can also set them next to a fan for 8-12 hours; this method is not as effective and is harder to get cracker dry depending on where you live. The final option is to collect and use Silica Gel packs (the ones that come in your shoebox) to absorb the moisture. Simply air dry, then place all mostly dry fruits in a Ziploc bag with a handful of these babies.
Step 8: Multiple Flushes
The same cakes can be reused two to three times after flushing for the first time.
To promote a second and third flush you will allow the cakes to dry out for a few days after your flush. Don’t worry, a slight blue or yellow tint in the mycelium is normal when drying.
Repeat the dunking process but this time do not add the casing layer of vermiculite. Place the cakes back in the grow chamber, misting and fanning as before.
After your second or third flush, you may start to notice contaminants on the cake. When in doubt, throw it out.
And that’s it! Hopefully, this Tek has inspired you to expand your learning and take on more advanced bulk growing techniques!
Best guide on the web
Great article!
What’s the recommended humidity level in the growbox?
Upper 90’s is ideal.